모델 > 그래프 > 영향 그림...

Models > Graphs > Influence plot...

Linux 사례 (MX 21)

데이터셋을 활성화시키고, 분석 모형을 만들었다면, '모델 > 그래프 > 영향 그림...' 메뉴 기능을 사용할 수 있다. carData 패키지의 Prestige 데이터셋을 이용하여 연습해보자.


먼저, Prestige 데이터셋을 활성화 시키자. '데이터 > 패키지에 있는 데이터 > 첨부된 패키지에서 데이터셋 읽기...' 메뉴 기능을 선택하고, 다음 화면에서 carData 패키지에 포함된 데이터셋들 중에서 Prestige를 찾아서 선택한다. 그러면, R Commander 상단의 <활성 데이터셋 없음> 버튼이 'Prestige'로 바뀐다.


Prestige 데이터셋을 이용하여 LinearModel.1 모형을 만든다. '통계 > 적합성 모델 > 선형 모델...' 메뉴 기능을 이용할 수 있다.

LinearModel.1 <- lm(prestige ~ education + log(income), data=Prestige)
summary(LinearModel.1)

LinearModel.1 모형이 활성화된 이후, '모델 > 그래프 > 영향 그림...' 메뉴 기능을 선택하면 아래와 같은 하위 화면이 등장한다.

Linux 사례 (MX 21)
Linux 사례 (MX 21)


Linux 사례 (MX 21)


?influencePlot   # car 패키지에 있는 influencePlot 도움말 보기

'Models > Graphs' 카테고리의 다른 글

6. Influence index plot...  (0) 2022.06.21
2. Residual quantile-comparison plot...  (0) 2022.06.21
4. Added-variable plots...  (0) 2022.06.20
3. Component + residual plots...  (0) 2022.06.20
7. Effect plots...  (0) 2022.03.09

모델 > 그래프 > 추가-변수 그림...

Models > Graphs > Added-variable plots...

Linux 사례 (MX 21)

'모델 > 그래프 > 추가-변수 그림...' 메뉴 기능은 데이터셋이 활성화되고, 분석 모형이 만들어진 이후 사용할 수 있다. carData 패키지의 Prestige 데이터셋을 이용하여 연습해보자.


먼저, Prestige 데이터셋을 활성화 시키자. '데이터 > 패키지에 있는 데이터 > 첨부된 패키지에서 데이터셋 읽기...' 메뉴 기능을 선택하고, 다음 화면에서 carData 패키지에 포함된 데이터셋들 중에서 Prestige를 찾아서 선택한다. 그러면, R Commander 상단의 <활성 데이터셋 없음> 버튼이 'Prestige'로 바뀐다.


Prestige 데이터셋을 이용하여 LinearModel.1 모형을 만든다. '통계 > 적합성 모델 > 선형 모델...' 메뉴 기능을 이용할 수 있다.

LinearModel.1 <- lm(prestige ~ education + income, data=Prestige)
summary(LinearModel.1)

LinearModel.1 모형이 활성화된 이후, '모델 > 그래프 > 추가-변수 그림...' 메뉴 기능을 선택하면 아래와 같은 하위 화면이 등장한다.

Linux 사례 (MX 21)

기본 설정으로 추천된 사항들을 그대로 사용하자. 예(OK) 버튼을 누른다.

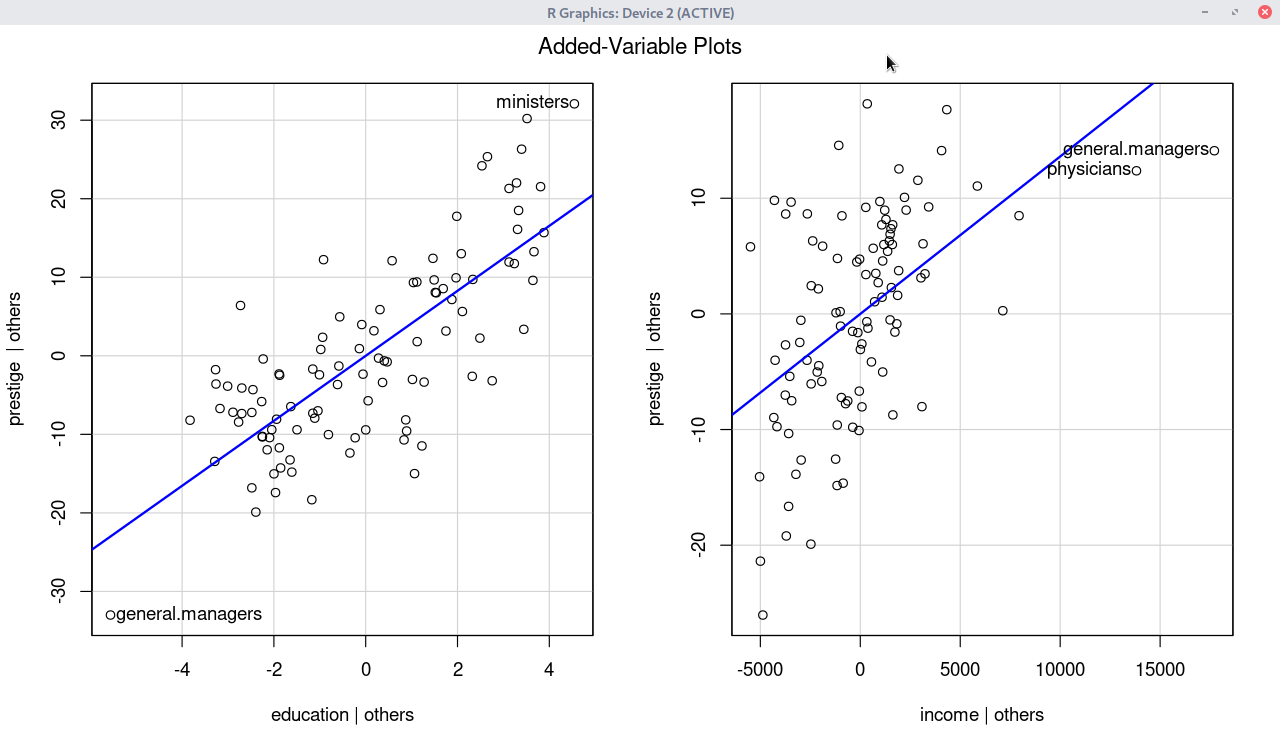
avPlots(LinearModel.1, id=list(method="mahal", n=2))

Linux 사례 (MX 21)


회귀선에서 멀리 떨어져 있다고 추천된 2개의 사례들을 Prestige 데이터셋에서 제거해보자. general.managers가 중복되기 때문에 모두 3개의 사례가 삭제된다. 사례 삭제는 R Commander 상단에 있는 <데이터셋 편집하기> 버튼을 누르고 해당 사례를 찾아 삭제하는 방식을 취했다.


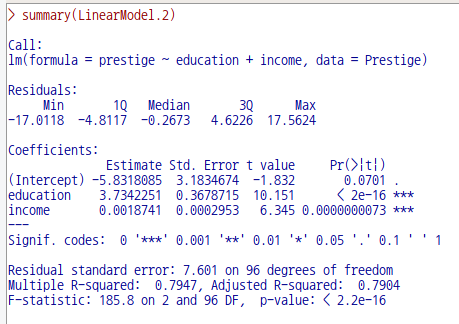
LinearModel.2 <- lm(prestige ~ education + income, data=Prestige)
summary(LinearModel.2)

Linux 사례 (MX 21)

앞서 만든 LinearModel.1과 비교해보자.

Linux 사례 (MX 21)

avPlots() 함수를 이용하여 새롭게 만든 LinearModel.2의 실제 회귀계수를 앞서 만든 그래프와 비교해보자.

Linux 사례 (MX 21)

'Models > Graphs' 카테고리의 다른 글

6. Influence index plot...  (0) 2022.06.21
2. Residual quantile-comparison plot...  (0) 2022.06.21
5. Influence plot...  (0) 2022.06.21
3. Component + residual plots...  (0) 2022.06.20
7. Effect plots...  (0) 2022.03.09

모델 > 그래프 > 성분 + 잔차 그림...

Models > Graphs > Component + residual plots...

Linux 사례 (MX 21)

데이터셋이 활성화되고 통계적으로 분석된 모형이 만들어진 경우, '모델 > 그래프 > 성분 + 잔차 그림...' 메뉴 기능을 사용할 수 있다. carData 패키지의 Prestige 데이터셋을 이용하여 연습해보자.


먼저 Prestige 데이터셋을 활성화 시킨다. '데이터 > 패키지에 있는 데이터 > 첨부된 패키지에서 데이터셋 읽기...' 메뉴 기능을 통해서 carData 패키지에서 Prestige 데이터셋을 찾아서 선택하면 된다. 그러면, R Commander 상단의 <활성 데이터셋 없음> 버튼이 'Prestige'로 바뀐다.


Prestige 데이터셋을 이용하여 LinearModel.1, LinearModel.2 라는 두 개의 모형을 차례로 만든다. '통계 > 적합성 모델 > 선형 모델...' 메뉴 기능을 이용할 수 있다.


LinearModel.1 <- lm(prestige ~ education + log(income), data=Prestige)
summary(LinearModel.1)
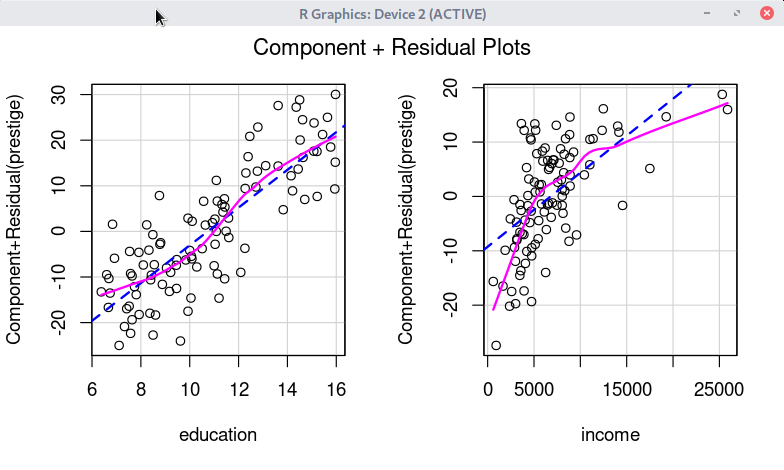
LinearModel.2 <- lm(prestige ~ education + income, data=Prestige)
summary(LinearModel.2)

그리고 두 모형의 '성분 + 잔차 그림...'을 차례로 만든다. 먼저 R Commander 상단의 <모델: LinearModel.1> 을 선택한 후, '모델 > 그래프 > 성분 + 잔차 그림...' 메뉴 기능을 선택한다.


crPlots(LinearModel.1, smooth=list(span=0.5))

Linux 사례 (MX 21)

crPlots(LinearModel.2, smooth=list(span=0.5))

Linux 사례 (MX 21)

'Models > Graphs' 카테고리의 다른 글

6. Influence index plot...  (0) 2022.06.21
2. Residual quantile-comparison plot...  (0) 2022.06.21
5. Influence plot...  (0) 2022.06.21
4. Added-variable plots...  (0) 2022.06.20
7. Effect plots...  (0) 2022.03.09

+ Recent posts